
이전 프로젝트에서 Spring Security와 JWT를 사용해 로그인을 구현했었다.
그 당시에는 구현만 집중하고 개념에 대한 정리를 한 적이 없는 것 같아 Spring Security의 인증과 권한에 대해 기본적인 개념을 정리해보려고 한다.
Spring Security
애플리케이션의 인증, 인가와 같은 보안 기능을 제공해준다.
보안과 관련된 많은 기능을 제공해 편리하게 원하는 보안 기능을 설계할 수 있다.
동작 구조
스프링 시큐리티는 서블릿 필터(인터셉터 X)를 기반으로 동작한다.

위 그림처럼 필터는 DispatcherServlet 앞에 배치되어 있다.
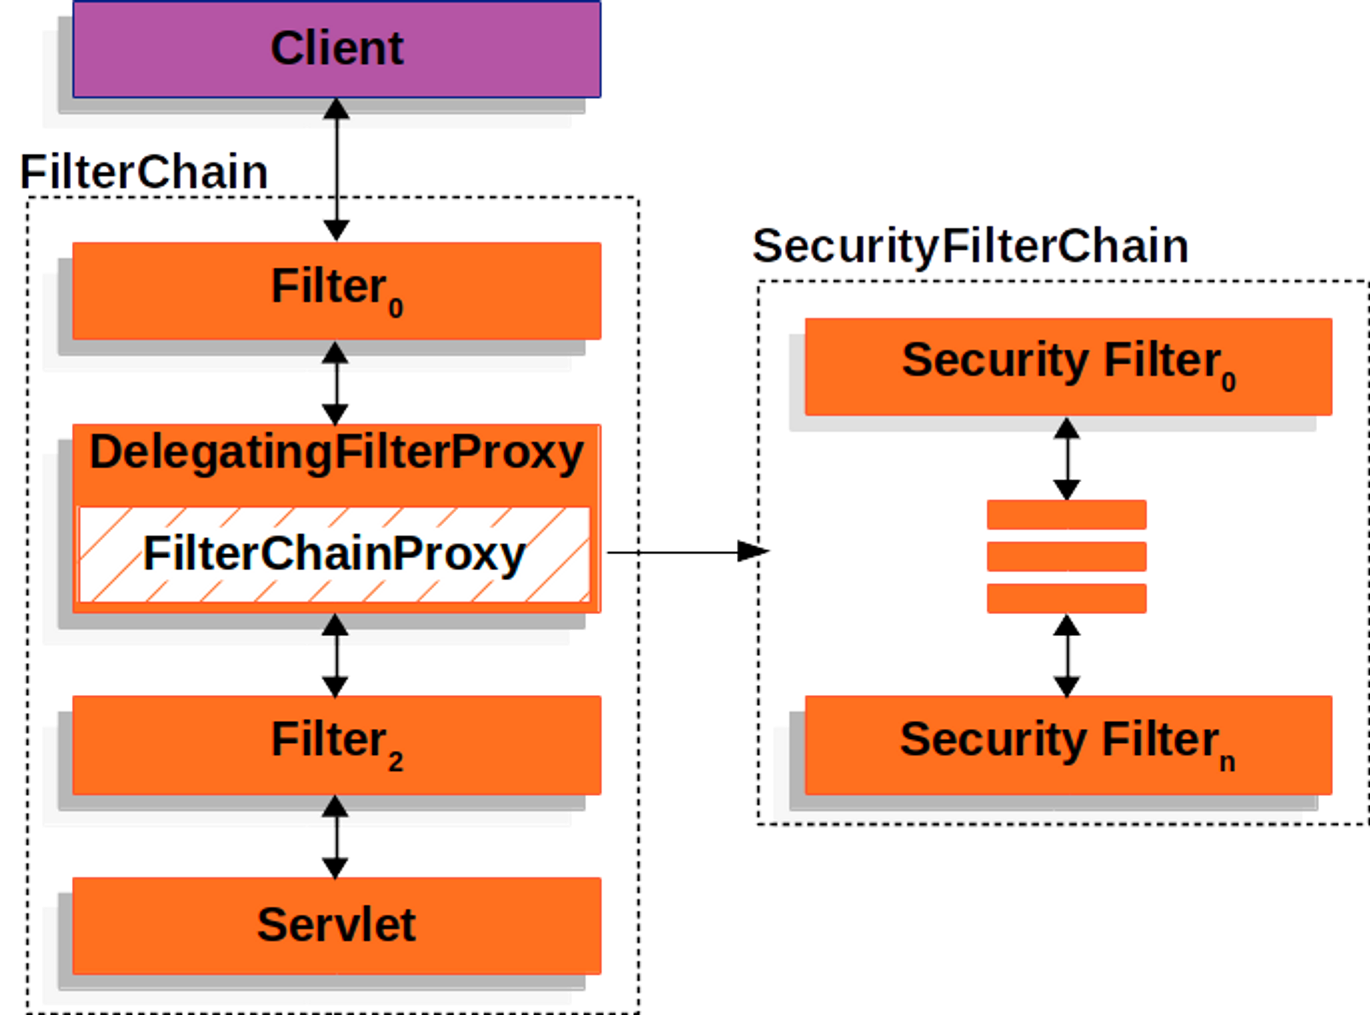
스프링 시큐리티는 사용하고자 하는 필터 체인을 서블릿 컨테이너의 필터 사이에서 동작 시키기 위해 DelegatingFilterProxy를 사용한다.
- DelegatingFilterProxy
- 서블릿 컨테이너의 생명 주기와 스프링 애플리케이션 컨텍스트 사이에서 다리 역할을 하는 필터 구현체
- 표준 서블릿 필터를 구현하고 있고, 역할을 위임할 FilterChainPorxy를 내부에 가지고 있다.
- FilterChainProxy
- Spring Security에서 제공하는 필터이다.
- SecurityFilterChain을 통해 많은 Security Filter를 사용할 수 있다.
- FilterChainProxy에서 사용할 수 있는 Security Filter들은 List 형태로 담을 수 있어 URI 패턴에 따라 특정 Security Filter 체인을 선택해 사용할 수 있다.
Security Filter Chain에서 사용하는 필터는 여러 종류가 있고, 각 필터마다 실행되는 순서가 다르다.
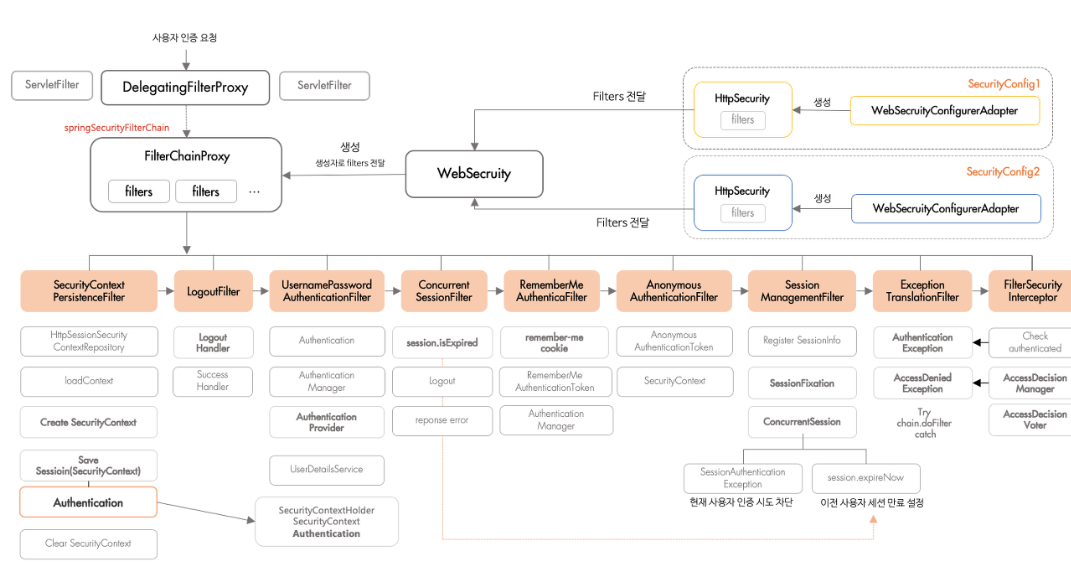
위와 같이 수많은 종류의 필터가 있다. 각 순서가 정해져 있다.
Security Filter Chain은 WebSecurityConfiurerAdapter 클래스를 상속받아 설정할 수 있다. 해당 클래스를 상속받는 클래스를 여러 개 생성하면 된다.
이 때 WebSecurityConfigurerAdapter 클래스에는 @Order 애노테이션을 통해 우선순위가 설정되어 있는데, 이를 설정해주는 것도 중요하다.
별도의 설정이 없다면 스프링 시큐리티에서는 SecurityFilterChain에서 사용하는 필터 중 UsernamePasswordAuthenticationFilter를 이용해 인증을 처리하게 된다.
대략적인 인증 수행 과정
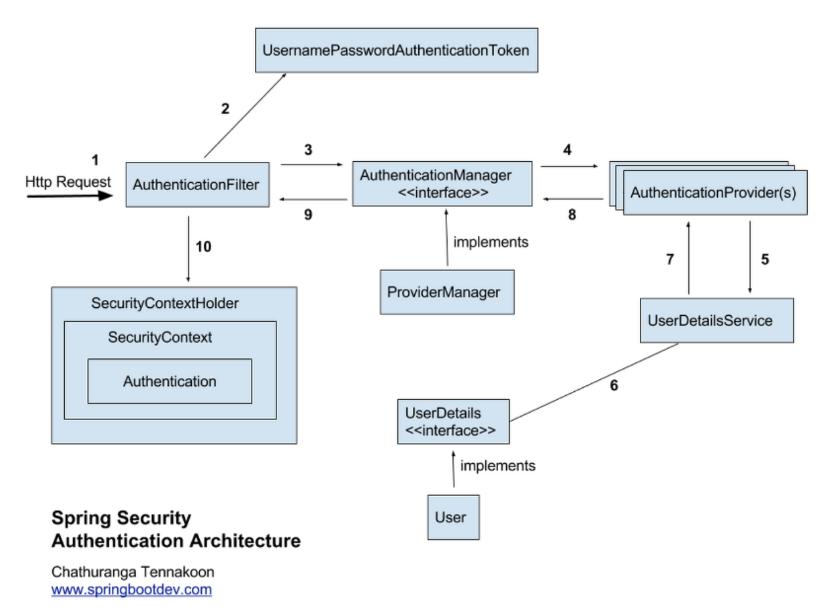
- 클라이언트 요청
- 서블릿 필터에서 SecurityFilterChain으로 작업 위임
- UsernamePasswordAuthenticationFilter에서 인증 처리
- 위 그림에서는 AuthenticationFilter에 해당되는 부분
- 변경 가능
- AuthenticationFilter에서는 username과 password를 추출해 토큰을 생성
- 생성된 토큰을 AuthenticationManager에 전달
- 보통 사용되는 구현체가 ProviderManager
- ProviderManager는 인증을 위해 AutenticationProvider로 토큰을 전달
- AuthenticationProvider가 토큰 정보를 UserDetailService에 전달
- UserDetailService는 전달받은 정보를 통해 DB에서 일치하는 사용자를 찾아 UserDetails 객체를 생성
- UserDetails 객체를 상속해 엔티티를 직접 만들 수 있고 따로 구현하지 않으면 기본적으로 제공하는 User 클래스를 사용해 해당 객체를 생성하게 된다.
- 만약 커스텀 UserDetails를 생성했다면 이를 사용하기 위해 UserDetailService도 상속해 구현해주어야 한다.
- 보통 찾은 사용자 정보를 기반으로 UserDetails 객체를 반환하는 역할인데 세부적으로 동작의 조정이 필요할 때 커스터마이징 한다.
- UserDetails 객체는 AuthenticationProvider에 전달
- Provider에서 인증을 수행하고 성공하면 ProviderManager로 권한을 담은 토큰을 전달
- ProviderManager는 검증된 토큰을 AuthenticationFilter로 전달
- AuthenticationFilter는 검증된 토큰을 SecurityContextHolder에 있는 SecurityContext에 저장.
SecurityContext에 인증 정보를 저장한 것을 이용해 이후 요청에서 인증된 사용자로 취급하게 된다.
구현 코드와 동작 비교
커스텀 로그인 필터
1
2
3
4
5
6
7
8
9
10
11
12
13
14
15
16
17
18
19
20
21
22
23
24
25
26
27
28
29
30
31
32
33
34
35
36
37
38
39
40
41
42
43
44
45
46
47
48
49
50
51
52
53
54
55
56
57
58
59
60
61
62
63
@RequiredArgsConstructor
public class LoginFilter extends UsernamePasswordAuthenticationFilter {

    private final AuthenticationManager authenticationManager;
    private final JwtUtil jwtUtil;
    private final RedisUtil redisUtil;
    private final CookieUtil cookieUtil;

    // 인증 시도 메서드
    @Override
    public Authentication attemptAuthentication(HttpServletRequest request, HttpServletResponse response)
            throws AuthenticationException {

        try {
            // 요청에서 JSON 데이터를 읽어와 LoginFormDto 객체로 변환
            LoginFormDto loginForm = new ObjectMapper().readValue(request.getInputStream(), LoginFormDto.class);

            // 사용자명과 비밀번호를 추출하여 UsernamePasswordAuthenticationToken을 생성
            String username = loginForm.getUsername();
            String password = loginForm.getPassword();
            UsernamePasswordAuthenticationToken authToken = new UsernamePasswordAuthenticationToken(username, password, null);

            // AuthenticationManager에게 인증 요청을 위임
            return authenticationManager.authenticate(authToken);
        } catch (IOException e) {
            throw new RuntimeException(e);
        }
    }

    // 인증 성공 시 호출되는 메서드
    @Override
    protected void successfulAuthentication(HttpServletRequest request, HttpServletResponse response, FilterChain chain,
                                            Authentication authResult) throws IOException, ServletException {
        // 인증된 사용자 정보를 가져옴
        LoginDto loginDto = (LoginDto) authResult.getPrincipal();
        String username = loginDto.getUsername();

        // 사용자 권한을 가져옴
        String role = authResult.getAuthorities().iterator().next().getAuthority();

        // JWT 토큰 생성
        String accessToken = jwtUtil.createAccessToken(username, role, 60 * 60 * 10L);
        String refreshToken = jwtUtil.createRefreshToken(username, 60 * 60 * 10000L);

        // Refresh 토큰을 쿠키에 저장
        Cookie cookie = cookieUtil.createCookie("refreshToken", refreshToken);
        response.addCookie(cookie);

        // Access 토큰을 헤더에 추가
        response.addHeader("Authorization", "Bearer " + accessToken);

        // Redis에 토큰을 저장
        redisUtil.saveAccessToken(username, accessToken, 60 * 60 * 10L);
        redisUtil.saveRefreshToken(username, refreshToken, 60 * 60 * 10000L);
    }

    // 인증 실패 시 호출되는 메서드
    @Override
    protected void unsuccessfulAuthentication(HttpServletRequest request, HttpServletResponse response,
                                              AuthenticationException failed) throws IOException, ServletException {
        response.setStatus(401);
    }
}
기본 로그인 프로세스를 커스터마이징한 클래스이다.
- attemptAuthentication()
- 사용자가 제출한 로그인 정보를 읽어와 username, password를 이용해 권한을 담은 토큰을 만든다.
- 생성된 토큰을 AuthenticationManager에 전달한다.
- AuthenticationManager은 인증을 시도하게 된다.
- successfulAuthentication()
- 인증이 성공했을 경우 수행된다.
- 인증이 성공하면 JWT 토큰을 생성하고 JWT 토큰을 HTTP 응답 헤더와 쿠키에 추가한다.
- 이 JWT 토큰은 이후 요청에서 인증된 사용자를 식별하는 용도로 사용된다.
- unsuccessfulAuthentication()
- 인증이 실패했을 경우 수행된다.
- 인증이 실패하면 HTTP 상태 코드를 401(Unauthorized)로 설정한다.
UsernamePasswordAuthenticationFilter를 상속받은 클래스를 직접 구현해, 인증 시도 및 인증의 성공, 실패 경우를 직접 구현해주었다.
JWT 토큰 필터
1
2
3
4
5
6
7
8
9
10
11
12
13
14
15
16
17
18
19
20
21
22
23
24
25
26
27
28
29
30
31
32
33
34
35
36
37
38
39
40
41
42
43
44
45
46
47
48
49
50
51
52
53
54
@RequiredArgsConstructor
public class JwtFilter extends OncePerRequestFilter {
    private final JwtUtil jwtUtil;

    @Override
    protected void doFilterInternal(HttpServletRequest request, HttpServletResponse response, FilterChain filterChain)
            throws ServletException, IOException {
        String requestURI = request.getRequestURI();

        // 토큰 재발급 요청은 필터를 지나도록 설정
        if (requestURI.endsWith("/api/auth/refresh")) {
            filterChain.doFilter(request, response);
            return;
        }

        String authorization = request.getHeader("Authorization");

        // 토큰이 없거나 잘못된 경우 필터를 통과시킴
        if (authorization == null || !authorization.startsWith("Bearer ")) {
            filterChain.doFilter(request, response);
            return;
        }

        // 토큰 추출
        String token = authorization.split(" ")[1];

        // 토큰이 만료된 경우 401 상태 반환
        if (jwtUtil.isExpired(token)) {
            response.setStatus(HttpServletResponse.SC_UNAUTHORIZED);
            return;
        }

        // 토큰에서 사용자 정보 추출
        String username = jwtUtil.getUsername(token);
        String role = jwtUtil.getRole(token);

        Account account = Account.builder()
                .username(username)
                .role(Role.from(role))
                .build();

        LoginDto loginDto = new LoginDto(account);

        // Spring Security의 인증 객체 생성
        Authentication authToken = new UsernamePasswordAuthenticationToken(loginDto, null,
                loginDto.getAuthorities());

        // SecurityContextHolder에 인증 정보 저장
        SecurityContextHolder.getContext().setAuthentication(authToken);

        // 다음 필터로 요청 전달
        filterChain.doFilter(request, response);
    }
}
위에서 생성한 JWT 토큰을 이용해 사용자를 인증할때 사용되는 필터이다.
OncePerRequestFilter를 상속받는데, 요청 당 한 번만 실행되도록 설계되어 있는 필터이다.
같은 필터 체인 내에서 같은 요청에 대해 필터가 여러 번 실행되지 않도록 보장해준다.
- doFilterInternal()
- 요청 헤더에서 토큰을 꺼내 검증한다.
- 토큰의 재발급 혹은 토큰이 없거나 잘못된 경우 필터를 통과시키도록 한다.
- 토큰이 존재한다면, 토큰이 만료되었을 경우 401을 반환한다.
- 토큰이 존재하고, 토큰이 유효하다면 인증이 성공한 것이고 절차를 걸쳐 Spring Security 인증 객체를 생성한다.
- 사용자 인증 객체는 SecurityContextHolder에 저장되어 위에서 설명했듯 이후 요청은 인증된 사용자로 취급하게 한다.
필터 체인 설정
위에서 구현한 필터들을 등록해주어야 한다.
Spring Security에서 사용되는 필터 체인을 설정해야 한다. 각 필터를 지정된 위치에 등록한다.
세션을 사용하지 않고 stateless 방식으로 설정해 매 요청마다 JWT 토큰을 통해 인증을 확인하게 된다.
특정 경로는 인증 없이 접근할 수 있도록 설정하고 다른 모든 요청은 인증된 사용자만 접근할 수 있도록 설정한다.
1
2
3
4
5
6
7
8
9
10
11
12
13
14
15
16
17
18
19
20
21
22
23
24
25
26
27
28
29
30
31
32
33
34
35
36
37
38
39
40
41
42
43
44
45
46
47
48
49
50
51
52
53
54
55
56
57
@Configuration
@EnableWebSecurity
@RequiredArgsConstructor
public class SecurityConfig {
    private final AuthenticationConfiguration authenticationConfiguration;
    private final JwtUtil jwtUtil;
    private final RedisUtil redisUtil;
    private final CookieUtil cookieUtil;
    private final JwtNotAuthenticatedHandler jwtNotAuthenticatedHandler;

    @Bean
    public AuthenticationManager authenticationManager(AuthenticationConfiguration configuration) throws Exception {
        return configuration.getAuthenticationManager();
    }

    @Bean
    public BCryptPasswordEncoder bCryptPasswordEncoder() {
        return new BCryptPasswordEncoder();
    }

    @Bean
    public SecurityFilterChain filterChain(HttpSecurity http) throws Exception {
        // 커스텀 로그인 필터 생성
        LoginFilter customLoginFilter = new LoginFilter(authenticationManager(authenticationConfiguration), jwtUtil,
                redisUtil, cookieUtil);
        customLoginFilter.setFilterProcessesUrl("/api/auth/login");

        // CSRF, 폼 로그인, HTTP 기본 인증 비활성화
        http.csrf(AbstractHttpConfigurer::disable)
            .formLogin(AbstractHttpConfigurer::disable)
            .httpBasic(AbstractHttpConfigurer::disable);

        // 요청 경로별 인가 설정
        http.authorizeHttpRequests((auth) -> auth
                .requestMatchers("/", "/api/account/register", "/api/account/checkDuplicate/**",
                                 "/api/auth/login", "/api/auth/refresh", "/api/board/**",
                                 "/swagger-ui/**", "/v3/api-docs/**", "/api/mbti/favorite/**",
                                 "/api/webtoons/**").permitAll()
                .requestMatchers(HttpMethod.GET,"/api/comments/*").permitAll()
                .requestMatchers("/admin").hasRole("ADMIN")
                .anyRequest().authenticated());

        // 세션 관리: 세션을 사용하지 않도록 설정 (stateless)
        http.sessionManagement((session) -> session.sessionCreationPolicy(SessionCreationPolicy.STATELESS));

        // 인증 실패 시 403 대신 401 응답 반환하도록 설정
        http.exceptionHandling(exceptionHandling ->
                exceptionHandling.authenticationEntryPoint(jwtNotAuthenticatedHandler));

        // JWT 필터 등록 및 커스텀 로그인 필터 등록
        http.addFilterBefore(new JwtFilter(jwtUtil), UsernamePasswordAuthenticationFilter.class)
            .addFilterAt(customLoginFilter, UsernamePasswordAuthenticationFilter.class);

        return http.build();
    }
}
- @EnableWebSecurity
- 이 애노테이션을 사용하면 Spring Boot 애플리케이션에서 Spring Security의 기본 설정을 활성화한다.
- 이를 통해 애플리케이션에 보안 기능이 적용되고 인증 및 인가 관련 설정을 커스터마이징할 수 있다.
- WebSecurityConfigurerAdapter를 상속하거나 SecurityConfigurer를 구현하는 클래스를 활성화한다.
AccessDeniedHandler, AuthenticationEntryPoint
Spring Security에서 예외 처리와 관련된 인터페이스들이다.
- AccessDeniedHandler
- 인가 실패 시 동작을 정의한다.
- AuthenticationEntryPoint
- 인증 실패 시 동작을 정의한다.
이 인터페이스들을 커스터마이징해 사용자에게 명확한 오류 메시지를 제공하거나 특정 동작을 수행하도록 설정할 수 있다.
AccessDeniedHandler
사용자가 인증되었지만 특정 리소스에 접근할 권한이 없는 경우 동작을 정의한다. 즉, 권한이 부족한 경우의 동작을 정의할 수 있다.
1
2
3
4
5
6
7
8
9
10
11
12
13
14
15
16
17
18
19
20
21
22
import org.springframework.security.access.AccessDeniedException;
import org.springframework.security.web.access.AccessDeniedHandler;
import org.springframework.stereotype.Component;

import javax.servlet.ServletException;
import javax.servlet.http.HttpServletRequest;
import javax.servlet.http.HttpServletResponse;
import java.io.IOException;

@Component
public class CustomAccessDeniedHandler implements AccessDeniedHandler {

    @Override
    public void handle(HttpServletRequest request, HttpServletResponse response, AccessDeniedException accessDeniedException)
            throws IOException, ServletException {
        // 응답 상태 코드를 403으로 설정
        response.setStatus(HttpServletResponse.SC_FORBIDDEN);

        // 사용자에게 커스텀 오류 메시지를 제공
        response.getWriter().write("권한이 없습니다.");
    }
}
AuthenticationEntryPoint
1
2
3
4
5
6
7
8
9
@Component
public class JwtNotAuthenticatedHandler implements AuthenticationEntryPoint {

	@Override
	public void commence(HttpServletRequest request, HttpServletResponse response,
			 AuthenticationException authException) throws IOException, ServletException {
		response.sendError(HttpServletResponse.SC_UNAUTHORIZED, "Unauthorized - Authentication token이 유효하지 않습니다.");
	}
}
내가 구현했던 코드이다.
인증되지 않은 사용자가 보호된 리소스에 접근하려고 할 때의 동작을 정의한다.
JWT 토큰을 이용한 인증 방식을 채택했으므로 토큰의 인증 실패에 관련한 동작을 정의했다.
구현 후 SecurityConfig에 정의해주면 된다.
Role 관리
우선 현재 나의 구현 코드를 보자.
1
2
3
4
5
6
7
8
9
10
11
12
13
14
15
16
17
18
19
20
21
22
23
24
25
26
27
28
29
30
31
32
33
34
35
36
37
38
39
40
41
42
43
44
45
46
47
48
49
@RequiredArgsConstructor
public class LoginDto implements UserDetails {

	private final Account account;

	@Override
	public Collection<? extends GrantedAuthority> getAuthorities() {
		Collection<GrantedAuthority> authorities = new ArrayList<>();

		authorities.add(new GrantedAuthority() {
		@Override
		public String getAuthority() {
			return account.getRole().toString();
		}
	});

		return authorities;
	}

	@Override
	public String getPassword() {
		return account.getPassword();
	}

	@Override
	public String getUsername() {
		return account.getUsername();
	}

	@Override
	public boolean isAccountNonExpired() {
		return true;
	}

	@Override
	public boolean isAccountNonLocked() {
		return true;
	}

	@Override
	public boolean isCredentialsNonExpired() {
		return true;
	}

	@Override
	public boolean isEnabled() {
		return true;
	}
}
1
2
3
4
5
6
7
8
9
10
11
12
13
14
15
16
17
18
19
@Service
@RequiredArgsConstructor
public class LoginService implements UserDetailsService {

	private final AccountRepository accountRepository;

	@Override
	public UserDetails loadUserByUsername(String username) throws UsernameNotFoundException {

		Account findAccount = accountRepository.findByUsername(username)
		.orElse(null);

		if (findAccount != null) {
			return new LoginDto(findAccount);
		}

		return null;
	}
}
구현 코드는 Role에 따른 권한 부여를 통해 인가를 따로 나누는 기능이 없기 때문에 그 부분에 대한 구현이 되어있지 않다.
만약 Role마다 인가를 구현해주려면 아래와 같이 구현해볼 수 있다.
1
2
3
4
5
6
7
8
9
10
11
12
@RequiredArgsConstructor
public class LoginDto implements UserDetails {
    private final Account account;

    @Override
    public Collection<? extends GrantedAuthority> getAuthorities() {
        // 사용자의 역할을 GrantedAuthority로 변환하여 반환
        return List.of(new SimpleGrantedAuthority("ROLE_" + account.getRole().name()));
    }

    //...
}
1
2
3
4
5
6
7
8
9
10
11
12
13
14
15
@Service
public class MyUserDetailsService implements UserDetailsService {

    @Autowired
    private UserRepository userRepository; // 사용자 정보를 가져오는 레포지토리

    @Override
    public UserDetails loadUserByUsername(String username) throws UsernameNotFoundException {
        Account account = userRepository.findByUsername(username);
        if (account == null) {
            throw new UsernameNotFoundException("User not found");
        }
        return new LoginDto(account); // Account를 기반으로 UserDetails 객체를 반환
    }
}
- LoginDto가 사용자 정보를 포함하고, UserDetails를 확장해 사용자 권한 정보를 추가할 수 있다.
- 그리고 Service에서는 사용자 정보를 로드할 때 Role 정보를 포함하여 UserDetails 객체를 생성해 반환한다.
1
2
3
4
5
6
7
8
9
10
11
12
13
14
15
16
17
18
19
20
21
22
23
24
25
26
27
28
29
30
31
32
33
34
35
36
37
38
39
40
41
42
43
44
45
46
47
48
49
50
51
52
53
54
55
56
57
@Configuration
@EnableWebSecurity
@RequiredArgsConstructor
public class SecurityConfig {

    private final AuthenticationConfiguration authenticationConfiguration;
    private final JwtUtil jwtUtil;
    private final RedisUtil redisUtil;
    private final CookieUtil cookieUtil;
    private final JwtNotAuthenticatedHandler jwtNotAuthenticatedHandler;

    @Bean
    public AuthenticationManager authenticationManager(AuthenticationConfiguration configuration) throws Exception {
        return configuration.getAuthenticationManager();
    }

    @Bean
    public BCryptPasswordEncoder bCryptPasswordEncoder() {
        return new BCryptPasswordEncoder();
    }

    @Bean
    public SecurityFilterChain filterChain(HttpSecurity http) throws Exception {
        // 커스텀 로그인 필터 생성
        LoginFilter customLoginFilter = new LoginFilter(authenticationManager(authenticationConfiguration), jwtUtil,
                redisUtil, cookieUtil);
        customLoginFilter.setFilterProcessesUrl("/api/auth/login");

        // CSRF, 폼 로그인, HTTP 기본 인증 비활성화
        http.csrf(AbstractHttpConfigurer::disable)
            .formLogin(AbstractHttpConfigurer::disable)
            .httpBasic(AbstractHttpConfigurer::disable);

        // URL별 접근 권한 설정
        http.authorizeHttpRequests((auth) -> auth
                .requestMatchers("/", "/api/account/register", "/api/account/checkDuplicate/**",
                                 "/api/auth/login", "/api/auth/refresh", "/api/board/**",
                                 "/swagger-ui/**", "/v3/api-docs/**", "/api/mbti/favorite/**",
                                 "/api/webtoons/**").permitAll()
                .requestMatchers(HttpMethod.GET,"/api/comments/*").permitAll()
                .requestMatchers("/admin/**").hasRole("ADMIN")  // ADMIN 역할 필요
                .anyRequest().authenticated());

        // 세션 관리: 세션을 사용하지 않도록 설정 (stateless)
        http.sessionManagement((session) -> session.sessionCreationPolicy(SessionCreationPolicy.STATELESS));

        // 인증 실패 시 403 대신 401 응답 반환하도록 설정
        http.exceptionHandling(exceptionHandling ->
                exceptionHandling.authenticationEntryPoint(jwtNotAuthenticatedHandler));

        // JWT 필터 등록 및 커스텀 로그인 필터 등록
        http.addFilterBefore(new JwtFilter(jwtUtil), UsernamePasswordAuthenticationFilter.class)
            .addFilterAt(customLoginFilter, UsernamePasswordAuthenticationFilter.class);

        return http.build();
    }
}
- HttpSecurity 객체의 authrozeRequests에서 어떤 경로에 대한 접근 권한을 설정해줄 수 있다.
1
2
3
4
5
6
7
8
9
10
11
12
13
14
15
16
17
18
19
20
21
22
23
24
25
26
27
28
29
30
31
32
33
34
35
36
37
38
39
40
41
@RequiredArgsConstructor
public class JwtFilter extends OncePerRequestFilter {
    private final JwtUtil jwtUtil;

    @Override
    protected void doFilterInternal(HttpServletRequest request, HttpServletResponse response, FilterChain filterChain)
            throws ServletException, IOException {
        String authorization = request.getHeader("Authorization");

        if (authorization == null || !authorization.startsWith("Bearer ")) {
            filterChain.doFilter(request, response);
            return;
        }

        String token = authorization.split(" ")[1];

        if (jwtUtil.isExpired(token)) {
            response.setStatus(HttpServletResponse.SC_UNAUTHORIZED);
            return;
        }

        String username = jwtUtil.getUsername(token);
        String role = jwtUtil.getRole(token); // 토큰에서 역할 추출

        Account account = Account.builder()
                .username(username)
                .role(Role.from(role)) // 역할을 사용하여 Account 생성
                .build();

        LoginDto loginDto = new LoginDto(account);

        Authentication authToken = new UsernamePasswordAuthenticationToken(
                loginDto,
                null,
                List.of(new SimpleGrantedAuthority("ROLE_" + role)) // 역할을 GrantedAuthority로 설정
        );

        SecurityContextHolder.getContext().setAuthentication(authToken);
        filterChain.doFilter(request, response);
    }
}
- 그리고 JwtFilter에서도 JWT 토큰에서 Role 정보를 추출하고 이를 인증 객체에 반영해야 한다.
- 만약 UserDetails 객체에만 Role 정보를 반영하고, JWT 토큰에는 반영하지 않는다면 JWT 토큰을 채택한 인증, 인가 방식에서는 문제가 생길 수 있다.
- JWT 토큰만으로 사용자의 인증과 인가를 결정하게 되는데, 토큰에 Role 정보가 포함되지 않으면 사용자에게 부여된 권한을 알 수 없다.
- 이유를 인증/인가 동작 흐름을 통해 알아보자.
- LoginFilter가 로그인 요청을 처리한다. -> 인증을 위한 토큰을 생성하고 인증을 시도한다. -> 이 때 사용자 정보인 UserDetails 객체를 받게 된다. (Role 포함) -> 인증이 성공하면 JWT 토큰을 발급한다. -> 이제 JwtFilter가 JWT 토큰의 유효성을 검증하고 토큰에서 사용자 정보를 추출해 인증 객체를 생성한다. -> 이 인증 객체를 SecurityContextHolder가 가지고 있고 그 객체를 이용해 인가를 한다.
- 즉, 인증 객체를 JWT 토큰을 이용해 생성하는데 그 인증 객체에 Role 정보가 있어야 SecurityConfig에 설정된 인가 로직을 수행할 수 있게 되는 것이다. 따라서 JWT 토큰에도 Role 정보가 필요하다.
결론적으로는 UserDetailService에서 Role에 관한 정보를 포함한 UserDetails 객체를 반환하면 SecurityConfig에서 간단히 인가를 구현해줄 수 있다.
정리
Spring Security가 어떻게 동작하고, 내가 구현했던 코드는 그 동작방식 위에서 어떻게 커스터마이징했는지 간단히 알아보았다.
인증, 인가에 관한 많은 부분을 이미 구현해놓았고, 커스터마이징해 이용할 수 있다.
필요에 따라 자신의 상황에 알맞은 필터를 찾아서 커스터마이징해 구현해주면 여러 인증, 인가 동작들을 수월하게 구현할 수 있을 것이다.
구현 코드에 대한 조금 더 자세한 설명은 이 포스트를 참고하자.