
스프링부트 라이브러리
- Gradle은 의존관계가 있는 라이브러리를 함께 다운로드 한다.
우측 Gradle 에서 라이브러리의 의존관계를 확인 가능

- spring-boot-starter-web
- spring-boot-starter-tomcat: 톰캣 (웹서버)
- spring-webmvc: 스프링 웹 MVC
- spring-boot-starter-thymeleaf: 타임리프(View)
- spring-boot-starter(공통): 스프링부트 + 스프링코어 + 로깅
- spring-boot
- spring-core
- spring-boot-starter-logging
- logback, slf4j
- spring-boot
- spring-boot-starter-test
- junit: 테스트 프레임워크
- mockito: 목 라이브러리
- assertj: 테스트 코드의 편리한 작성을 도와주는 라이브러리
- spring-test: 스프링 통합 테스트 지원
View 환경설정
1
2
3
4
5
6
7
8
9
@Controller
public class HelloController {

    @GetMapping("hello")
    public String hello(Model model){
        model.addAttribute("data", "hello!!");
	    return "hello";
  }
}
1
2
3
4
5
6
7
8
9
10
<!DOCTYPE HTML>
<html xmlns:th="http://www.thymeleaf.org">
<head>
 <title>Hello</title>
 <meta http-equiv="Content-Type" content="text/html; charset=UTF-8" />
</head>
<body>
<p th:text="'안녕하세요. ' + ${data}" >안녕하세요. 손님</p>
</body>
</html>
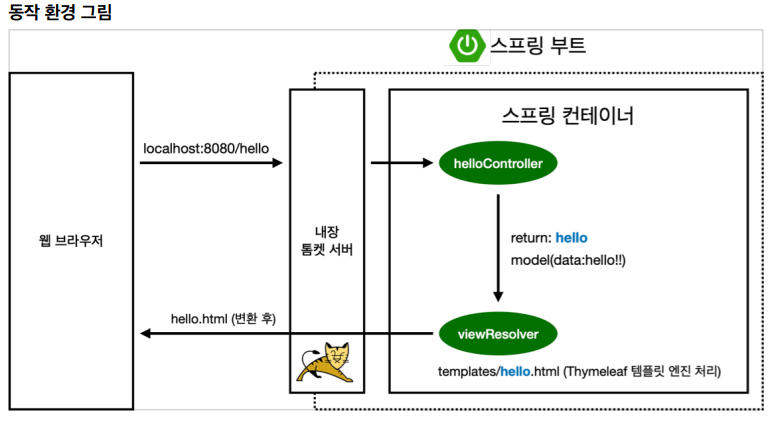
- 웹브라우저에서 localhost:8080/hello 라고 톰켓서버에 던짐(Get 방식을 간단히 하면 Http URL을 넘겨 받는, 즉 hello를 넘겨 받음) – 만약 GetMapping(“hi”) 였다면 localhost:8080/hi URL을 입력했을 때 hello함수가 동작해 return “hello”를 통해 hello.html을 찾는다.
- model에 “data”라는 이름을 가진 hello!! 값을 가진 데이터를 추가한다.
- return “hello” = hello.html을 찾아서 렌더링해라.
** spring-boot-devtools 라이브러리를 추가하면, html 파일을 컴파일만 해주면 서버 재시작 없이 View 파일의 변경이 가능하다. build -> Recompile
** cmd 창에서 build/libs 경로까지 간 후 java -jar {파일명}-0.0.1-SNAPSHOT.jar 파일을 실행해주면 build 가능. 추후 배포할 경우 jar파일만 복사하여 배포가능.
@GetMapping
@GetMapping(“hello”) 라고 할 때, URL의 hello를 get하는 것. 즉 가져오는 것이다.
hello URL에 접근하면 어노테이션이 적용된 함수인 String hello() 함수가 불러와지고
model 변수에는 “data” 라는 이름을 가진 “hello!!” 라는 값이 포함되게 된다.
이후 hello 함수의 return값인 “hello”를 통해 hello.html 파일을 찾아가게 된다. hello.html 파일에서 model에 있는 data를 사용가능하게 된다.
정적 컨텐츠
파일을 그대로 웹 브라우저에 전달해 주는 것.
- static 경로에 hello-static.html 파일을 만들어 작성하면 localhost:8080/hello-static.html URL로 접근 가능.
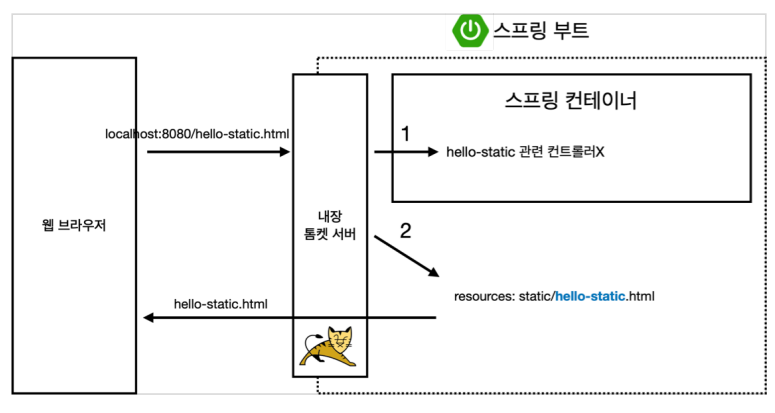
** 만약 hello-static 관련 컨트롤러가 존재한다면 컨트롤러가 우선순위를 가진다.
MVC와 템플릿 엔진
-MVC = Model, View, Controller
이전 jsp 같은 경우 View 파일 하나에서 데이터 접근하는 등의 여러 기능을 해 유지보수 접근이 어려운 상태였음.
- Controller
1
2
3
4
5
@GetMapping("hello-mvc")
public String helloMvc(@RequestParam("nameParam") String name, Model model){
    model.addAttribute("name", nameParam);
    return "hello-template";
}
- View
1
2
3
4
5
<html xmlns:th="http://www.thymeleaf.org">
<body>
<p th:text="'hello ' + ${name}">hello! empty</p>
</body>
</html>
**RequestParam 의 이용 URL에서 localhost:8080/hello-mvc 로 전달하면 오류발생 name 변수를 주지 않았기 때문
URL에서 ?= 을 이용해 localhost:8080/hello-mvc?name=spring!!! 과 같이 파라미터를 전달 가능하다.
API (@ResponseBody)
정적컨텐츠 방식으로 데이터를 내리느냐
API 방식으로 데이터를 내리느냐
- JSON = Key, Value 형태로 이루어진 데이터 오브젝트를 전달하기 위해 사람이 읽을 수 있는 텍스트를 사용하는 개방형 표준 포맷 비동기 브라우저/서버 통신을 위해, 넓게는 XML을 대체하는 주요 데이터 포맷
1
2
3
4
5
6
7
8
9
10
11
12
13
14
15
@GetMapping("hello-api")
@ResponseBody
public Hello helloApi(@RequestParam("name") String nameParam){
    Hello hello = new Hello();
	hello.setName(nameParam);
    return hello;
}

static class Hello{
    private String name;

	public String getName(){return name;}

    public void setName(String name){this.name = name}
}
** @ResponseBody = http 에서 헤더부와 바디부가 있는데, 응답 바디부에 이 데이터를 내가 직접 넣어주겠다. view 이런 것 거치지 않고 문자 그대로가 전달된다. (json 방식으로)
- 결과

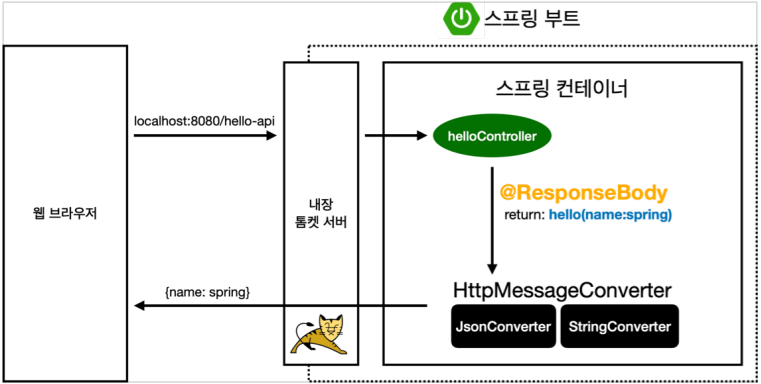
- @ResponseBody 를 사용
- HTTP의 BODY에 문자 내용을 직접 반환
- ‘viewResolver’ 대신 ‘HttpMessageConverter’가 동작
- 기본 문자처리 : ‘StringHttpMessageConverter’
- 기본 객체처리 : ‘MappingJackson2HttpMessageConverter’
객체가 오면 JSON 형태로 변환해서 요청을 해온 웹 브라우저에 반환.
문자가 오면 문자 그대로 요청을 해온 웹 브라우저에 반환.
즉 MVC 구조와 템플릿 엔진을 통해 view 부분을 렌더링해서 고객에게 전달을 하느냐.
@ResponseBody를 통해 view 이런거 없이 바로 객체를 반환해 데이터를 보내주느냐. 의 차이이다.
** 위 코드에서는 hello 객체를 전달했음.