
소셜 로그인을 구현해보자.
소셜 로그인
우선 기존 Spring Security + JWT 구조의 구현 방식에 OAuth2 소셜 로그인 기능을 추가해 확장하는 방식을 채택하려고 한다.
소셜 로그인 구현 고민
구글, 네이버, 카카오 소셜 로그인을 구현할 예정인데, 각각 다른 API를 사용할 뿐 기본적인 구조는 비슷하다.
우선 OAuth2 인증 방식은 여러가지가 있다.
- OAuth2 인증 방식
- Code Grant: 가장 많이 사용하고 권장되는 방식이다.
- 클라이언트는 사용자를 인증하기 위해 인증 서버로 인증 코드를 요청한다.
- 사용자는 인증 서버에서 로그인 및 권한 부여를 수행한다.
- 인증 서버는 클라이언트에 인증 코드를 발급한다.
- 클라이언트는 인증 코드를 이용해 액세스 토큰과 리프레시 토큰을 요청할 수 있다.
- 인증 서버가 클라이언트에 토큰을 발급한다.
- 비교적 구현이 복잡하다는 단점은 있다.
- Implicit Grant: 클라이언트가 브라우저에서 직접 토큰을 요청하는 방식
- 인증 서버는 사용자 인증 후 액세스 토큰을 발급하고 클라이언트로 바로 응답한다.
- 토큰이 브라우저 URL에 노출되어 보안성이 낮아 추천하지 않는다.
- Resource Owner Password Credentials Grant
- 사용자가 자신의 ID와 비밀번호를 클라이언트에게 직접 입력한다.
- 클라이언트가 사용자의 자격 증명을 인증 서버로 전송해 액세스 토큰을 요청한다.
- 클라이언트가 사용자 비밀번호를 알게되는 방식이기 때문에 보안이 매우 취약하다.
- Client Credentials Grant
- 클라이언트가 자신의 자격 증명을 인증 서버에 전달한다 (클라이언트 ID, 비밀 키)
- 인증 서버는 클라이언트를 인증하고 액세스 토큰을 발급한다.
- 사용자가 개입하지 않고 클라이언트가 서버 간 통신을 하기 위해 사용되는 방식이다.
- Code Grant: 가장 많이 사용하고 권장되는 방식이다.
이러한 이유로 프로젝트에서는 Code Grant 방식을 사용할 것이다.
- Code Grant 방식 동작 순서
- 로그인 요청 -> 로그인 페이지
- 로그인 성공 -> 인증 서버에서 코드 발급 (redirect_url 쿼리파라미터로 발급)
- 스프링 서버에서 발급된 코드로 Access 토큰 요청
- Access 토큰 발급 -> Access 토큰을 이용해 유저 정보를 요청 -> 획득
위와 같은 방식으로 동작하게 된다.
소셜 로그인/회원가입을 하고 JWT 토큰을 발급하는 로직이 필요한데 그 토큰을 어떻게 관리할지가 중요하다.
JWT 토큰 방식을 쓸 것이지만, 일단 세션 방식으로의 구현 구조를 보자.
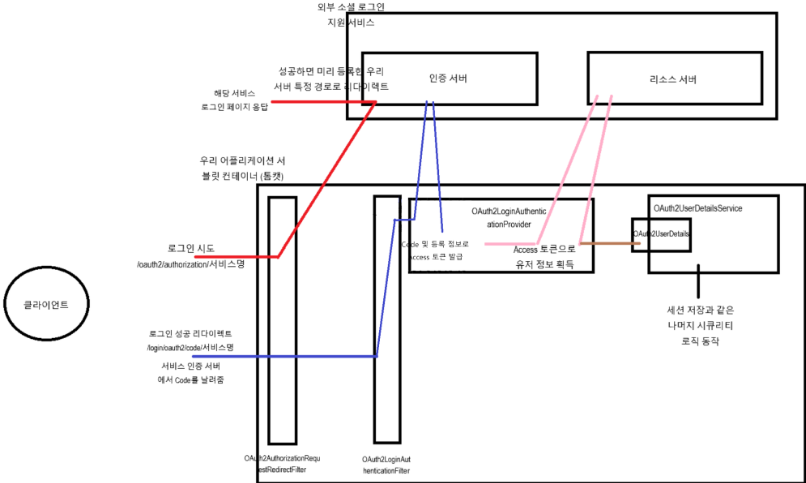
- 로그인 시도
- 로그인에 성공하면 미리 등록한 서버의 특정 경로로 리다이렉트
- 인증 서버에서 코드를 발급해주고 드 코드를 사용해 토큰을 획득한다.
- 유저 정보로 세션을 생성한다.
OAuth2 + JWT 방식에서의 고민
JWT 방식에서는 로그인에 성공하면 JWT 토큰을 발급해주어야 된다.
그리고 웹/하이브리드/네이티브앱 각각의 특징이 있는데, OAuth2 Code Grant 방식은 동작의 책임을 프론트엔드/백엔드 측에 둘 수 있다. 그래서 어디에 책임을 두어야할 지 고민해야 한다.
- 로그인에 성공하면 JWT를 발급한다.
- 프론트단에서 로그인 경로에 대해 하이퍼링크를 실행하면 소셜 로그인 창이 등장하고 로그인 로직이 실행된다.
- 그런데 로그인이 성공되면 JWT가 발급되어야 하는데, 하이퍼링크로 실행했기 때문에 JWT를 받을 로직이 없다는 것이 문제다.
- API Client(Axios, fetch)로 요청을 보내면 백엔드측으로 요청이 전송이 되지만 외부 서비스 로그인 페이지를 확인할 수 없게 된다.
프론트/백엔드 책임 분배
- 모든 책임을 프론트가 맡는 경우
- 프론트단에서 로그인 -> 코드 발급 -> Access 토큰 -> 유저 정보 획득 과정을 모두 수행한다.
- 백엔드에서는 유저 정보를 받아 그 유저 정보로 JWT 토큰을 발급한다.
- 이 경우는 프론트에서 보낸 유저 정보의 진위 여부를 따지기 위한 추가적인 로직이 필요해진다.
- 책임을 나누어 가지는 경우
- 이 방식은 우선 잘못된 방식이다.
- 프론트단에서 로그인 -> 코드 발급을 하고 코드를 백엔드로 전송한다.
- 백엔드단에서 코드를 통해 토큰을 발급하고 유저 정보를 획득한 후 그 유저 정보로 JWT를 발급한다.
- 혹은 프론트단에서 토큰까지 발급 후 토큰을 백엔드로 전송하는 방식.
- 그러나 이는 대형 서비스 개발 포럼 및 보안 규격에서 지양하는 방식이다.
- 온전히 프론트단에서 책임을 맡거나, 백엔드단에서 책임을 맡는 것을 권장한다고 한다.
- 코드나 토큰을 중간에서 넘겨주는 행위를 지양하기 때문이다.
- 모든 책임을 백엔드가 맡는 경우
- 소셜 로그인 버튼을 누른다.
- 하이퍼링크를 통해 백엔드 API GET 요청을 보낸다.
- 백엔드가 로그인 요청을 한다.
- 코드 발급 -> 코드로 토큰 요청 … -> JWT 토큰 발급 과정이 모두 백엔드 단에서 이루어진다.
- 단, 여기서 하이퍼 링크로 요청을 했기 때문에 JWT 토큰을 획득하기가 까다롭다는 단점이 있다.
이제 이러한 정리를 바탕으로 실제 구현을 해보자.
구현
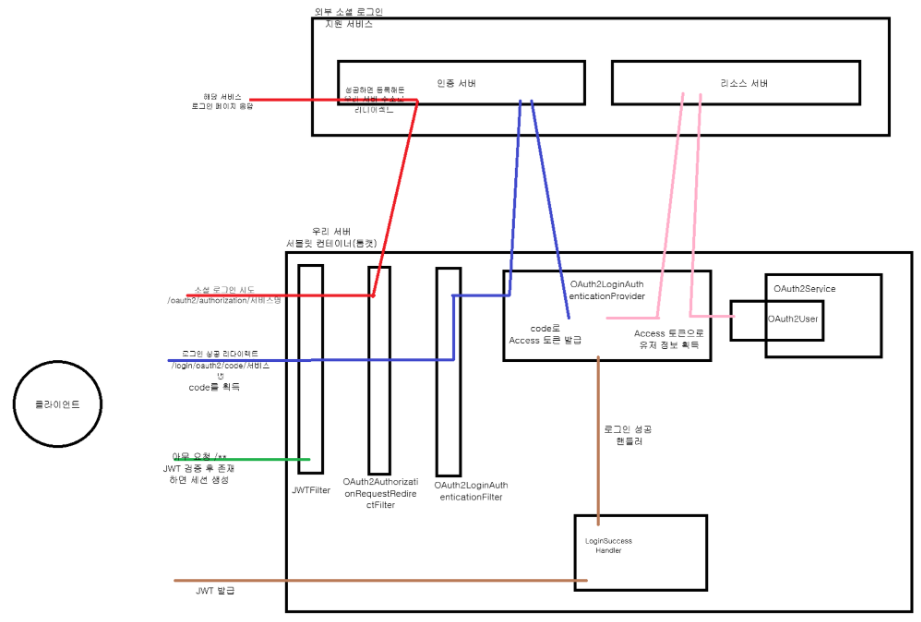
- 클라이언트가 소셜 로그인 버튼을 누른다.
- 백엔드측에서는 API 요청을 받는다.
- GET /oauth2/authorization/google
- 이 요청을 OAuth2AuthorizationRequestRedirectFilter에서 잡아 인증 서버에 요청을 보낸다.
- 인증 서버는 해당 요청에 대해 로그인 페이지를 응답해준다.
- 이 페이지에서 로그인을 성공하게 되면 등록해둔 특정 서버 주소로 리다이렉트가 된다. 이 때 코드를 같이 받는다.
- /login/oauth2/code/google 로 코드를 받고 그 요청을 OAuth2LoginAuthenticationFilter에서 잡아 인증서버로 전달한다.
- 인증서버에 코드가 전달되면 토큰을 발급받는다.
- OAuth2LoginAuthenticationProvider에서 토큰을 받고 그 토큰으로 유저 정보를 획득하는 과정이 이루어진다.
- 로그인에 성공하면 로그인 성공 핸들러에서 JWT 토큰을 발급하게 된다.
각 필터가 동작하게 되는 주소를 정리해보자.
- JWTFilter
1
모든 주소에서 동작한다.
- OAuth2AuthorizationRequestRedirectFilter
1
2
3
/oauth2/authorization/google
/oauth2/authorization/naver
/oauth2/authorization/kakao
- OAuth2LoginAuthenticationFilter
1
2
3
/login/oauth2/code/google
/login/oauth2/code/naver
/login/oauth2/code/kakao
환경 변수 설정
그리고 이제 각각의 로직이 동작하기 위해 각 서비스 (google, naver, kakao)별로 설정 값이 필요하다.
- application.properties
1
2
3
4
5
6
7
8
9
10
11
12
13
#registration
spring.security.oauth2.client.registration.naver.client-name=naver
spring.security.oauth2.client.registration.naver.client-id=발급아이디
spring.security.oauth2.client.registration.naver.client-secret=발급비밀번호
spring.security.oauth2.client.registration.naver.redirect-uri=http://localhost:8080/login/oauth2/code/naver
spring.security.oauth2.client.registration.naver.authorization-grant-type=authorization_code
spring.security.oauth2.client.registration.naver.scope=name,email // 가져오는 범위

#provider
spring.security.oauth2.client.provider.naver.authorization-uri=https://nid.naver.com/oauth2.0/authorize
spring.security.oauth2.client.provider.naver.token-uri=https://nid.naver.com/oauth2.0/token
spring.security.oauth2.client.provider.naver.user-info-uri=https://openapi.naver.com/v1/nid/me
spring.security.oauth2.client.provider.naver.user-name-attribute=response
필요한 정보들을 세팅해주면 된다.
OAuth2UserService
1
2
3
4
5
6
7
8
9
10
11
12
13
14
15
16
17
18
19
20
21
22
23
24
25
26
27
28
29
30
31
32
33
34
35
36
37
38
39
40
41
42
43
44
45
46
47
48
49
50
51
52
53
54
55
56
57
58
59
60
61
62
63
64
65
66
67
68
@Service
@Slf4j
@RequiredArgsConstructor
public class CustomOAuth2UserService extends DefaultOAuth2UserService {

    private final UserRepository userRepository;

    @Override
    @Transactional
    public OAuth2User loadUser(OAuth2UserRequest userRequest) throws OAuth2AuthenticationException {
        OAuth2User oAuth2User = super.loadUser(userRequest);
        log.info("oAuth2User: " + oAuth2User);

        String registrationId = userRequest.getClientRegistration().getRegistrationId();

        OAuth2Response oAuth2Response = null;

        if (registrationId.equals(NAVER.getName())) {
            oAuth2Response = new NaverResponse(oAuth2User.getAttributes());
        } else if (registrationId.equals(GOOGLE.getName())) {
            oAuth2Response = new GoogleResponse(oAuth2User.getAttributes());
        } else {
            return null;
        }

        // 리소스 서버에서 발급 받은 정보로 사용자를 특정할 수 있는 아이디
        String username = oAuth2Response.getProvider() + " " + oAuth2Response.getProviderId();

        User existData = userRepository.findByUsername(username);

        if (existData == null) {
            User user = User.builder()
                    .username(username)
                    .name(oAuth2Response.getName())
                    .email(oAuth2Response.getEmail())
                    .role(Role.USER)
                    .imageKey(oAuth2Response.getProfileImage())
                    .district(null)
                    .build();

            userRepository.save(user);

            UserDto userDto = UserDto.builder()
                    .username(username)
                    .name(oAuth2Response.getName())
                    .email(oAuth2Response.getEmail())
                    .role("ROLE_USER") //수정 필요
                    .image(oAuth2Response.getProfileImage())
                    .district(null)
                    .build();

            return new CustomOAuth2User(userDto);
        } else {
            existData.updateData(oAuth2Response.getName(), oAuth2Response.getEmail(), oAuth2Response.getProfileImage());

            UserDto userDto = UserDto.builder()
                    .username(username)
                    .name(oAuth2Response.getName())
                    .email(oAuth2Response.getEmail())
                    .role("ROLE_USER") //수정 필요
                    .image(oAuth2Response.getProfileImage())
                    .district(null)
                    .build();

            return new CustomOAuth2User(userDto);
        }
    }
}
추가적인 정보가 필요한 부분은 따로 받아야하는데, 그 부분은 아직 구현하지 않은 상태다.
단순하게 소셜 로그인을 요청하면 정보가 있을 때 회원가입을 진행해 user 테이블에 저장하고, 데이터가 이미 있다면 로그인이 되도록 하는 구조이다.
위와 같이 구현하고
1
2
.oauth2Login((oauth2) -> oauth2.userInfoEndpoint(
  (userInfoEndpointConfig) -> userInfoEndpointConfig.userService(customOAuth2UserService)))
SecurityConfig에 위와 같이 추가해주면 위에서 설명했던 동작 구조가 알아서 동작하게 된다.
Spring Security가 OAuth2 인증을 위한 필터 체인을 기본적으로 제공해주기 때문에 별도 구현이 필요없는 것이다. 만약 무언가 더 필요하다면 해당 필터를 확장해볼 수 있다.
최종적으로 위 서비스 코드를 구현하고 config에 등록해줌으로써 토큰에서 사용자 정보를 조회하고 그 정보를 user 테이블에 저장하는 방식으로 가입 및 로그인을 구현한 것이다.
이제 로그인을 했을 때 그 상태를 보존하기 위한 JWT 토큰 발급에 관한 처리가 필요하다.
JWT 토큰 로직
프론트에서 소셜 로그인 버튼을 누르면 하이퍼 링크로 백엔드 API GET 요청이 된다.
- GET /oauth2/authorization/google
JWT 토큰을 발급하는 것 까지는 좋은데 하이퍼 링크 요청으로 온 로그인에 대해 어떻게 토큰을 줄 수 있냐에 대한 고민이 생긴다.
결론부터 말하면 카카오나 네이버 등의 여러 질문을 보았을 때 추천하는 쿠키 방식으로 구현을 하도록 한다.
1
2
3
4
5
6
7
8
9
10
11
12
13
14
15
16
17
18
19
20
21
22
23
24
25
26
27
28
29
30
31
32
33
34
35
@Component
@RequiredArgsConstructor
public class CustomSuccessHandler extends SimpleUrlAuthenticationSuccessHandler {

    private final JwtUtil jwtUtil;

    @Override
    public void onAuthenticationSuccess(HttpServletRequest request, HttpServletResponse response,
                                        Authentication authentication) throws IOException, ServletException {
        CustomOAuth2User customUserDetails = (CustomOAuth2User) authentication.getPrincipal();

        String username = customUserDetails.getUsername();
        Long userId = customUserDetails.getUserId();

        Collection<? extends GrantedAuthority> authorities = authentication.getAuthorities();
        Iterator<? extends GrantedAuthority> iterator = authorities.iterator();
        GrantedAuthority auth = iterator.next();
        String role = auth.getAuthority();

        String accessToken = jwtUtil.createAccessToken(userId, username, role);

        response.addCookie(createCookie("Authorization", accessToken));
        response.sendRedirect("http://localhost:5179/");
    }

    private Cookie createCookie(String key, String value) {
        Cookie cookie = new Cookie(key, value);
        cookie.setMaxAge(60 * 60 * 60);
//    cookie.setSecure(true);
        cookie.setPath("/");
        cookie.setHttpOnly(true);

        return cookie;
    }
}
- SimpleUrlAuthenticationSuccessHandler 는 Spring Security에서 인증 성공 시 후속 작업을 처리하는 기본 핸들러 클래스다.
- 위 구조에서는 인증에 성공했을 때 JWT Access 토큰을 발급하고, 쿠키에 담아 보낸 후 특정 경로로 redirect 하도록 해주는 역할을 한다.
1
2
3
.oauth2Login((oauth2) -> oauth2.userInfoEndpoint(
                        (userInfoEndpointConfig) -> userInfoEndpointConfig.userService(customOAuth2UserService))
                        .successHandler(customSuccessHandler))
핸들러 구현 후 마찬가지로 SecurityConfig에 해당 클래스를 추가해주면 된다.
토큰 발급은 이런 방식으로 처리해놓고, 토큰 검증에 대한 부분은 기존에 구현했던 JwtFilter를 사용하여 검증하도록 한다.
이러면 기본적인 소셜 로그인/회원가입 로직은 모두 동작하게 된다.
회원가입 시 추가적인 정보가 필요하다
우리 프로젝트에서는 소셜 로그인/회원가입 시 얻을 수 없는 지역 정보, 그리고 미용사로 가입할건지 고객으로 가입할건지에 대한 정보가 필요하다.
1
2
3
4
5
6
7
8
9
10
11
12
13
14
15
16
17
18
19
20
21
22
23
24
25
26
27
28
29
30
31
32
33
34
35
36
@Component
@RequiredArgsConstructor
@Slf4j
public class CustomSuccessHandler extends SimpleUrlAuthenticationSuccessHandler {

    private final JwtUtil jwtUtil;
    private final RedisUtil redisUtil;
    private final CookieUtil cookieUtil;

    @Override
    public void onAuthenticationSuccess(HttpServletRequest request, HttpServletResponse response,
                                        Authentication authentication) throws IOException, ServletException {
        CustomOAuth2User customUserDetails = (CustomOAuth2User) authentication.getPrincipal();

        String username = customUserDetails.getUsername();
        Long userId = customUserDetails.getUserId();
        String role = customUserDetails.getAuthorities().iterator().next().getAuthority();

        String accessToken = jwtUtil.createAccessToken(userId, username, role);
        String refreshToken = jwtUtil.createRefreshToken(userId, username, role);
        redisUtil.saveRefreshToken(userId.toString(), refreshToken, 60 * 60 * 10000L);

        response.addCookie(cookieUtil.createCookie("Authorization", accessToken));
        response.addCookie(cookieUtil.createCookie("Refresh-Token", refreshToken));

        log.info("Access Token: {}", accessToken);
        log.info("Refresh Token: {}", refreshToken);

        if ("ROLE_PENDING".equals(role)) {
            response.sendRedirect("http://localhost:5173/register");
        } else {
            //기존 회원은 메인 페이지로 리다이렉트
            response.sendRedirect("http://localhost:5173/");
        }
    }
}
- User Role에 PENDING이라는 역할을 추가했다.
- 만약 Role이 PENDING이라면 소셜 로그인/회원가입까지는 성공했지만 추가적으로 정보를 입력하여 회원가입을 최종적으로 가능하게 만드는 것이다.
- 따라서 PENDING일 경우 추가적인 회원가입 페이지로 redirect 하도록 만든다.
1
2
3
4
5
6
7
8
9
10
11
12
13
14
15
16
17
18
19
20
21
22
23
24
25
26
27
28
29
30
31
32
33
34
35
36
37
38
39
40
41
42
43
44
45
46
47
48
49
50
51
52
53
54
55
56
57
58
59
@Service
@Slf4j
@RequiredArgsConstructor
public class CustomOAuth2UserService extends DefaultOAuth2UserService {

    private final UserRepository userRepository;

    @Override
    @Transactional
    public OAuth2User loadUser(OAuth2UserRequest userRequest) throws OAuth2AuthenticationException {
        OAuth2User oAuth2User = super.loadUser(userRequest);
        log.info("oAuth2User: " + oAuth2User);

        String registrationId = userRequest.getClientRegistration().getRegistrationId();

        OAuth2Response oAuth2Response = null;

        if (registrationId.equals(NAVER.getName())) {
            oAuth2Response = new NaverResponse(oAuth2User.getAttributes());
        } else if (registrationId.equals(GOOGLE.getName())) {
            oAuth2Response = new GoogleResponse(oAuth2User.getAttributes());
        } else {
            return null;
        }

        // 리소스 서버에서 발급 받은 정보로 사용자를 특정할 수 있는 아이디
        String username = oAuth2Response.getProvider() + " " + oAuth2Response.getProviderId();

        User existData = userRepository.findByUsername(username);

        if (existData != null) {
            UserDto userDto = UserDto.fromEntity(existData);

            return new CustomOAuth2User(userDto);
        } else {
            User user = User.builder()
                    .username(username)
                    .email(oAuth2Response.getEmail())
                    .name(oAuth2Response.getName())
                    .imageKey(oAuth2Response.getProfileImage())
                    .role(Role.ROLE_PENDING)
                    .build();

            userRepository.save(user);

            UserDto userDto = UserDto.builder()
                    .userId(user.getId())
                    .username(user.getUsername())
                    .name(user.getName())
                    .email(user.getEmail())
                    .role(user.getRole().toString())
                    .image(user.getImageKey())
                    .district(null)
                    .build();

            return new CustomOAuth2User(userDto);
        }
    }
}
- 그래서 여기서도 userRepository.save() 로직이 포함된다.
- User 테이블에 정보를 저장하지만 ROLE을 통해 실제 회원가입/로그인 여부를 구분하는 것이다.
1
2
3
4
5
6
.authorizeHttpRequests(auth -> auth
        .requestMatchers("/oauth2/authorization/**","/api/test", "/actuator/**")
	    .permitAll()
	    .requestMatchers("/api/auth/join").hasRole("PENDING")
	    .anyRequest().hasAnyRole("USER", "SALON", "ADMIN")
)
- 대신 나머지 요청에 대해 다른 Role을 가지고 있을 때만 인가하도록 설정한다.
이렇게 처리해두고 추가적인 정보를 받는 회원가입 API를 만들어주면 된다.
기존에 PENDING으로 저장했던 User 데이터를 조회 후 변경감지로 지역, Role 정보를 update 해준다.
정리
이렇게 Google, Naver 소셜 로그인/회원가입 구현을 마칠 수 있었다.
Kakao 소셜 로그인은 Google, Naver와 API 주소 및 환경변수 설정 등 일부 부분에서 조금 다른 구조를 가진다. 물론 동작 로직 자체는 비슷하기 때문에 추후 다른 기능 구현이 완료된 뒤 추가할 예정이다.